Publishing a Python package with uv
If you've build a Python package, you know it requires a variety of tools.
- venv - for creating isolated environments
- setuptools - for packaging and distribution
- twine - for uploading packages to PyPI
- pip - for installing dependencies
uv is a tool that seeks to simplify this process by automating many of the steps involved in packaging and publishing Python packages. In a few minutes I'll show you how to use uv to publish a Python package to PyPI.
Prerequisites
Before we begin, you will need to install uv. You can do this a variety of ways, documented in the uv installation guide. The easiest way is with a simple shell script:
$ curl -sSL https://uv.astral.sh/install.sh | sh
Step 1: Initializing a package
To setup a new Python package with uv, navigate to the directory where you want to create your package and run the following command:
$ uv init --lib my-package
This will create a new directory called my-package with the basic structure of a Python package.
my-package/
├── src/
│   └── my_package/
│       ├── __init__.py
│       └── py.typed
├── pyproject.toml
└── README.md
A quick overview of each of these files:
src/my_package/__init__.py: This is the main module of your package.src/my_package/py.typed: This file indicates that your package supports type hinting.pyproject.toml: This file contains metadata about your package, such as its name, version, and dependencies.README.md: This file contains a description of your package.
Step 2: Creating a package
Navigate to the src/my_package directory to start adding your Python code.
for this example, we'll create a calculator package with basic arithmetic functions.
Create a new file called calculator.py and add the following code:
def add(a: float, b: float) -> float:
    return a + b

def subtract(a: float, b: float) -> float:
    return a - b
Now we need to update the __init__.py file
to make these functions available when the package is imported. Currently we would
have to import the functions like:
>>> from my_package.calculator import add, subtract
>>> add(2, 3)
5
That's alright, but it wouldn't not be very user friendly if
our package was named something like calc.
For more information on structuring Python packages,
check out the official documentation.
Update the src/my_package/__init__.py file to include the following code:
from .calculator import add, subtract
This allows users to import the functions directly from the package:
>>> from my_package import add, subtract
>>> add(2, 3)
5
Step 3: Configuring package metadata
There are many options you can configure in your pyproject.toml file, and I recommend
checking out the pypi documentation on packaging and distributing projects
to learn more.
At a minimum you should update the following fields in pyproject.toml
name: The name of your package.version: The version of your package.description: A short description of your package.authors: The authors of your package.license: The license for your package.license-files: The license files for your package.
Additional fields you may want to consider
urls: A list of URLs for your package, such as the homepage, repository, and documentation.keywords: A list of keywords that describe your package, used by PyPI to help users find your package.classifiers: A list of classifiers that describe your package, such as the programming language, license, and intended audience used by PyPI to categorize your package.
Here is what your pyproject.toml file might look like after updating the metadata:
[project]
name = "my-package"
version = "0.1.0"
description = "A simple calculator package"
readme = "README.md"
requires-python = ">=3.12"
dependencies = []

authors = [
    {name = "Your Name", email = "your.email@example.com"}
]
license = "MIT"
license-files = ["LICEN[CS]E.*"]

urls = [
    "Homepage" = "https://example.com/my-package",
    "Repository" = "https://github.com/yourusername/my-package",
    "Issue Tracker" = "https://github.com/yourusername/my-package/issues",
    "Documentation" = "https://example.com/my-package/docs",
]

[build-system]
requires = ["uv_build>=0.9.21,<0.10.0"]
build-backend = "uv_build"
Step 4: Building a package
Now that your package is ready, you can build and publish it to PyPI. To build your package, run the following command in the root directory of your package:
$ uv build
Building source distribution (uv build backend)...
Building wheel from source distribution (uv build backend)...
Successfully built dist\my_package-0.1.0.tar.gz
Successfully built dist\my_package-0.1.0-py3-none-any.whl
This will create a dist directory containing the built package files.
my-package-0.1.0.tar.gz: An archive of your source code to be uploaded with your package.my-package-0.1.0-py3-none-any.whl: A wheel file, which is a pre-compiled package ready to be installed directly with tools like uv or pip.
For more information about .whl files check out the official documentation.
Step 5: Publishing a package
To publish your package, first create an account on PyPI if you don't already have one. Next, head over to the API tokens page and create a new token.
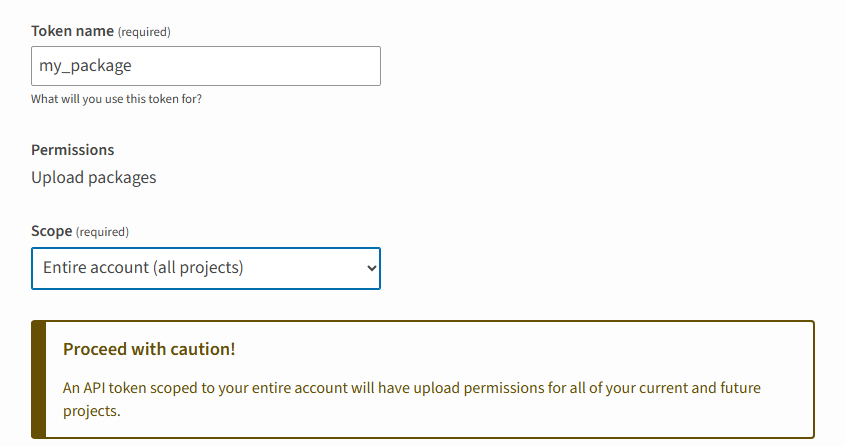
Note: Make sure to copy the token and store it securely, as you won't be able to see it again. Trusted Providers are recommended for better security; see how to set them up in my other post here
Now you can publish your package using the following command:
$ uv publish --token PASTE_YOUR_PYPI_TOKEN_HERE
This will upload your package to PyPI, making it available for others to install and use. Try installing your package using pip:
$ pip install my-package
$ python

>>> from my_package import add, subtract
>>> add(5, 7)
12
>>> subtract(10, 4)
6
Additional Reading
Dependencies
If our package needs other packages as dependencies, uv streamlines this process. For a simple example, I'll add the faker package, which generates fake data.
To add faker as a dependency for our package, we simply need to run:
$ uv add faker
Using CPython 3.13.5
Creating virtual environment at: .venv
Resolved 3 packages in 6ms
      Built my-package @ file:///B:/tutorials/my-package
Prepared 1 package in 19ms
Installed 3 packages in 640ms
 + faker==40.1.0
 + my-package==0.1.0 (from file:///B:/tutorials/my-package)
 + tzdata==2025.3
Because I ran this in a fresh project, it first created a virtual environment
and then installs faker and its dependency tzdata to our project.
If we open pyproject.toml we will see it updated accordingly
requires-python = ">=3.13"
dependencies = [
    "faker>=40.1.0",
]
uv.lock will also be created/updated to lock the dependencies to specific versions,
ensuring consistent installs across different environments.
To illustrate the issue lock files seek to solve, if someone has specified faker>=39 in their pyproject.toml file in a package without a lock file.
When they run uv install, uv will resolve and install the latest compatible version of faker.
Developer 1 could install the package today and get faker v39.
Developer 2 installing the package in a few months may get faker v41 which could break your code if v41
introduced breaking changes to the API.
By using a lock file, both developers will install the same version of faker, ensuring consistency.
Open Source best practices
When publishing an open source package, there are a few best practices to follow to ensure your package is easy to use and maintain. Here are are a few, as well as useful links to reference.
- Include a
CONTRIBUTING.mdfile to provide guidelines for contributing to your project - Include a
CODE_OF_CONDUCT.mdfile to set expectations for behavior in your project's community - Use Semantic Versioning for your package versions
- Include tests for your package to ensure its functionality
- Write clear and concise documentation for your package
- Nobody is going to use your package if they don't know how to use it!